
DIVE SITES |
Popes Eye: Popes Eye is a rock annulus located in the middle of Port Phillip Bay near Queenscliff. It was originally intended to be a fort complete with cannons to guard the shipping channels. The fort was never completed and the rock annulus is now full of sand, with about 1 to 2 metres depth inside and as deep as 11 metres around the outside. This is normally a very easy dive site and quite popular for novice divers. Popes Eye is a marine reserve and no fishing is allowed, consequently there are many species of fish to be found when diving. Don't stand still to long as the territorial Angel Fish will hassle you when you sit on their favorite rock.
Popes Eye can be dived in any tide or slack water. The south side is the best which can be dived on an ebb tide or slack. The northe side is quite sandy but has the anchor chain and some rock wall and can be dived on a flood tide or slack. The tidal current can be as strong as 5 to 8 knots, which is to strong to swim against. Be careful because it wouldn't be the first time divers have been picked up by the Able Tasman.
Arthur's Seat/Dromana: Arthur's seat is a very good scallop area about 1 Km due east of the boat ramp. Best scallops are obtained in about 10 metres of water. Don't forget that you need a Victorian fishing license and the bag limit is 100 per person.
Portsea Hole: Portsea hole is another popular dive site and is quite close to Portsea Jetty. You line up the old Norris Barracks fence and the end of Portsea Jetty with Portsea Pub. The hole bottoms out at 33 metres however the best diving is on the south east wall which drops from 13m to about 25m before it sands out.
Portsea Hole is a slack water dive only and although it is close to Portsea Jetty, it can only be boat dived.
GPS: S 38° 18.745 E144° 42.650 (AUS66)
Eliza Ramsden: The Ramsden struck Corsair Rock in 1875, she was re-floated and but subsequently sank inside Port Phillip Bay near the Quarantine Station. The wreck now rests in 19 metres of water on a flat sandy bottom. Much of the bow is intact and makes a spectacular site when the vis is good. The stern has been blasted by the port authority and not much of it remains, however this is still a very good wreck dive.
This is a slack water dive and it is also in the shipping channel. You cannot anchor and you must get a shipping report from Point Lonsdale or the Seapilot Station prior to diving. This site is diveable in most weather conditions, however big seas will reduce viz to a couple of metres.
GPS: S 38° 17.725 E144° 40.385 (AUS66)
North Wall/Spec Reef: North Wall is also known as Spectacular Reef. The top of the wall is in about 19 metres and the wall drops of to over 60 metres. The club has investigated the wall to 56 metres and at this depth it is a gentle slope of into the murky depths. The wall has large overhangs, small caves, swim throughs and lots of crevices to explore. At the top of the wall Crays can be found.
North Wall is a slack water dive and it is also in the shipping channel. You cannot anchor and you must get a shipping report from Point Lonsdale or the Seapilot Station prior to diving. This site is diveable in most weather conditions, however big seas will reduce viz to a couple of metres.
GPS: S 38° 17.425 E144° 39.707 (AUS66)
Nepean Wall: Nepean Wall is located on the south side of the shipping channel and is on the opposite side to Spectacular Reef. The top of the wall is in 18 metres and drops of sharply to 40 metres eventually bottoming out in 65 metres of water. The wall is dotted with ledges, caves and overhangs. You can also find the odd cray or two if your lucky.
Nepean Wall is a slack water dive and it is also on the edge of the shipping channel. You cannot anchor and you must get a shipping report from Point Lonsdale or the Seapilot Station prior to diving. This site is diveable in most weather conditions, however big seas will reduce viz to a couple of metres. Divers must exit the water quickly at the end of the dive and the shot line must be retrieved quickly. It wouldn't be the first time the tide has towed the dive flag under water never to be seen again.
GPS: S 38° 17.587 E144° 39.447 (AUS66)
Quarantine Station Drift: This site is located in front of the old quarantine station at Point Nepean, which is now Norris Barracks. This area is where quarantined ships were anchored from 1850 to about 1950. The site has 6 large anchors and is littered with old bottles, china plates, bowels, cups, clay jugs and the occasional 9 inch black powder gun shell. Some very good finds have been made in this area including intact plates from the White Star Line, P&O, Black Ball Packets, Pacific Steam Navigation Company, A.U.S.N.C and a full carving plate from the Albert Star.
This site can be shore or boat dived and can be dived on any tide or slack water. The best time is when the water is moving and drift diving is the most common way to find things and cover a large area without swimming to hard. It's not quite as simple as it sounds though.
Saw Tooth Drift: As the name suggests this is a drift dive over a reef which has saw tooth rises evenly spaced about 20 metres apart. The site is located in front of Fort Queenscliff. This is a very colourful site with lots of sponges and interesting reef formations. The site is also known for the number of old bottles which can be found.
This site can only be boat dived and can be dived on any tide or slack water. The best time is when the water is moving and drift diving is the most common way to find things and cover a large area without swimming to hard. It's not quite as simple as it sounds though.
Corsair Rock: Corsair Rock is famous for the amount of ship wreck sites located on or near the rock. The rock sits about 2 metres below the surface and breaks in a heavy swell. Diving around the rock there are many artifacts littering the bottom including, broken bottles, earthen ware jugs, clay pipes, broken crockery and bronze hull spikes and copper hull sheeting. You can also find some very big crays in the many rock ledges.
This is a slack water dive site only which can only be boat dived in exceptionally calm seas. The remains of the wrecks are covered by the historic ship wrecks act and nothing can be taken.
GPS: S 38° 18.110 E144° 38.400 (AUS66)
Lonsdale Wall: Lonsdale Wall is probably the best wall dive in the bay. Lonsdale wall has more spectacular drop offs than either North Wall or Nepean Wall and is a very popular wall dive. The top of the wall starts at a depth of 13 metres and drops of to 50 metres. The wall has many large overhangs, caves and ledges covered in sponges and gorgonia coral. You can also pick up the odd cray or two.
Lonsdale Wall is a slack water dive. This site is diveable in moderate weather conditions, however big swells make it to dangerous to dive . Divers must exit the water quickly at the end of the dive and the shot line must be retrieved quickly. It wouldn't be the first time the tide has towed the dive flag under water never to be seen again.
GPS: S 38° 17.612 E144° 37.754 (AUS66)
Inner Corsair Wall: Very spectacular wall dive with lots of ledges, caves and drop offs. The top of the wall starts at 10 metres and bottoms out at over 60 metres. The wall is a good cray spot and good crays have been caught at 38 metres. The club is still exploring this dive site and its full potential is not yet known.
Inner Corsair Wall can only be dived on slack as it is only just out of the heads. Although shipping does not normally transit this area it is technically still in the shipping channel.
GPS: S 38° 18.220 E144° 38.265 (AUS66)
Outer Corsair Wall: Not yet dived by the club but looks like a good wall on the depth sounder. Probably similar to Inner Corsair.
Outer Corsair Wall can only be dived on slack as it is only just out of the heads. Although shipping does not normally transit this area it is technically still in the shipping channel.
GPS: S 38° 18.260 E144° 38.100 (AUS66)
George Roper: This is a 2033 ton, iron hulled, four masted barque which struck Lonsdale reef on 4 July 1883. The George Roper was built in 1882 and its dimensions were 92m x 11.9m x 7.2m. The ship was wrecked on its maiden voyage from Liverpool to Melbourne. The hull has collapsed and the wreck is very accessible. The remains of stone ware bottles, cement barrels, railway iron and slate litter the wreck and the occasional cray can be found hiding in amongst the collapsed bulkheads. The masts have fallen over and large sections can be found nearby. There are a number of wrecks in this area (Elizabeth 1860, Gange 1887, Holyhead 1890) and some of the wreckage found nearby is probably from other wrecks which struck Lonsdale Reef. Also located in the general area are the Sacramento1853, SS Conside 1852, David 1850, Yarrow and Thetis 1848.
The George Roper can be dived on slack or an ebb tide as it is protected from the outwards current by Lonsdale Reef. It cannot be dived on a flood tide as you will still get sucked into the bay. The sea will also need to be calm as the wreck is in very shallow water.
Cape Schanck: Very good dive and one of the only sites that can be dived in a south westerly swell as the bay is protected by a headland. Crays can be caught in the bay and as the site is not dived regularly the chances of catching some are good. Out side of the bay on the west side of the point is very good as well however, this is a calm seas dive only. The drawback with shore diving Cape Schanck is the very hard up hill climb after the dive. You need to be very fit. The best way to get there is by boat from Flinders.
Koonya: Back beach cray spot. Easy walk into water and very interesting limestone reef structures to look at. Crays can be caught in the many reef ledges and abalone are abundant. Koonya can only be dived on a low swell as the water depth is quite shallow and ranges from 4 to 8 metres.
Mushroom Rocks/Castle Rock: Located off the Point Lonsdale surf club just outside the heads. This is cray spot which can be accessed in moderate swell. The mushroom shaped rock platforms are an extension of the reef which runs from the shore out to sea for about 2 Km. Castle Rock is in 20 metres at the following GPS marks 38 17.902 and 144 35.869 Datum WGS84. It can also be located by the cray pots that are often around it. Closer in shore there are many other shallow reefs in 10 metres to dive on as well when the sea is calm.
Peterborough/Bay of Isles: The bay of Isles is a large bay with many rock columns and small islands. There are lots of shallow reefs that are home to more crays than you can eat. Access to the bay by boat is via a very steep boat ramp into a small bay called boat ramp bay (original). Launching is by 4WD only. The bay can be shore dived but you are in for a bit of a swim to get to deep water.
|
||
| Boat Ramp Bay | Launching Rib at Boat Ramp Bay | Bay of Isles |
HMVS Cerberus: Wreck is not accessible to divers and is unsafe. Access to the area immediately surrounding the wreck is also prohibited. Wreck of HMVS Cerberus, located at half moon bay, near suburb of Black Rock. Wreck lies in 4 to 6 metres of water with top of wreck extending out of water by a few metres. Lots of marine life have made this wreck home including many large rays, some of which seem tame. Fish life includes schools of brim and white bait, and the odd whiting. Entire site is covered in mussels and even some abalone.
![]()
RMS Australia: The Royal Mail Steamer (RMS) Australia, which was a 3590 ton P&O ship, rests on Point Nepean near Corsair Rock . The ship hit Corsair Rock on 20 June 1904 and now lies in 4 to 8 metres of water at Inner Corsair reef. Sadly the wreck was blasted by the Port Melbourne Authority in the 1960-70s to clear the channel between Corsair and Big Rocks, which has reduced the wreck to a mass of twisted metal and marine growth. The original dimensions were 141.7m x 15.9m x 8m. Other wrecks located near by are the Ontario 1853, Marmion 1853, Campbell 1914, Pryde 1866, Sussex 1870 and Time 1949
J Class Submarines: There are six World War I, J Class submarines located in Victorian waters J1, J2, J3, J4, J5 and J7. The six subs were presented to Australia by the British Admiralty on 25 March 1919 and arrived in Australia in July 1919, eventually being disposed of between 1926 and 1930 due to their high operating costs and lack of reliability. Specs:| Class | Displ't | BHP | EHP | Speed Surface | Speed Submerged | Endurance | Tubes | Comp't |
| J7 | 1200/1760 | 3600 hp | 1400 hp | 19.5 kts | 9.5 kts | 4,000 m at 12 kts |
6: 4 bow, 2 beam | 44 |
| J1 - J5 | 1260/1820 | 3600 hp | 1400 hp | 19.5 kts | 9.5 kts | 4,000 m at 12 kts |
6: 4 bow, 2 beam | 44 |
Dimensions: 270 feet (p.p), 274.75 feet (o.a) x 23.5 feet x 14 feet
Engines: 3 sets of Vickers 12 cylinder solid injection, direct reversing 4 cycle 1200 B.H.P Diesel engines (14.5 in bore x 15 in stroke), 380 r.p.m.
Fuel: oil 80/91 tons.
When completed the J class were the fastest submarine in the world and were built to counter the erroneous reports that Germany was building subs with a top speed of 18-20 kts.
J5 (36 Metre Sub, 120 Foot Sub, Yellow Sub, Winged Sub or Deep Intact Sub): Completed Nov 1915 at Portsmouth Dock Yard. This sub lies upright with a small list to STBD and is often called the yellow sub because of the yellow anemonies that grow on the hull. She is easy to navigate through but as always be careful when entering the wreck.
GPS: S 38° 18.741 E144° 34.053 (AUS66)
J2 (38 Metre Sub, Broken Sub or Deep Sub): Completed Nov 1915 at Portsmouth Dock Yard. The Broken Sub lies in 38 metres of water and is broken in half about 5 metres behind the conning tower. The front half lists to stb at 45 degrees and the stern has worn down through the reef the wreck sits on over the years. At 36 metres near the conning tower is a plaque in memory of a diver that died while penetrating the wreck. Penetration is possible at the break but care should be taken when entering the wreck as silting can occur very easily. If you just swim over the wreck from stern to bow most of the dive will be spent in 33 metres. The wreck site is subject to currents and should only be dived by experienced divers.
GPS: S 38° 18.893 E144° 34.737 (AUS66)
J4 (26 Metre or 90 Foot Sub): Completed Feb 1916 at Pembroke Dock Yard. J4 is broken in half and is the shallowest of the subs located outside Port Phillip Bay.
GPS: S 38° 18.096 E144° 33.749 (AUS66)
![]() Old photo of J4 next to J1 (showing J1s gun on pillar deck)
Old photo of J4 next to J1 (showing J1s gun on pillar deck)
J1 (Intact Sub): Completed Sept 1915 at Devenport Dock Yard. She lies upright in 36 metres of water and is intact although the bow has started to collapse a bit. Condition wise she is very similar to J5 and a very good dive.
GPS S38º 19.042´ E144º 33.153´ (AUS 66)
J3 (Swan Island Sub): Completed Dec 1915 at Pembroke Dock Yard and is now located on the northeast end of Swan Island with the conning tower clearly visible above water.
J7 (Sandringham Yacht Club Sub): Completed Feb 1917 at Devenport Dock Yard and is now located at Sandringham Yacht Club. J1 to J5 have the same hull shape, although the conning towers are different. J7 has a different hull shape and the conning tower is set further aft than the other J’s.
J6 was sunk by friendly fire during WWI.
To view more photos of the J Class subs go to the Australian War Memorial website and search their data base of old photographs type in "J Class" in the search window.
For further info take a look at the following weblink J Class Subs
Brighton Jetty: The jetty is about 500 metres long with the last two thirds a rock wall breakwater, which is where most of the marine life lives. The average depth is quite shallow being no greater than 5 metres deep. Like most jetties there is the usual discarded junk and rubbish on the bottom and as the jetty is quite old, a few old bottles can be found if your prepared to look hard. We have found Codds, MBCV Beer bottles and Mitchell'sOld Irish Wisky. The jetty is an ideal safe and easy night dive for the novice night diver as it is very hard to get lost.
Sandringham Yacht Club: The yacht club harbour is teh final resting place of the J7 sub, which was originally used by the yacht club as a break water. The sub is now in the middle of the harbour and can be shore dived or dived from a small boat. The J7 is also a good night dive when the vis is good.
 |
 |
|
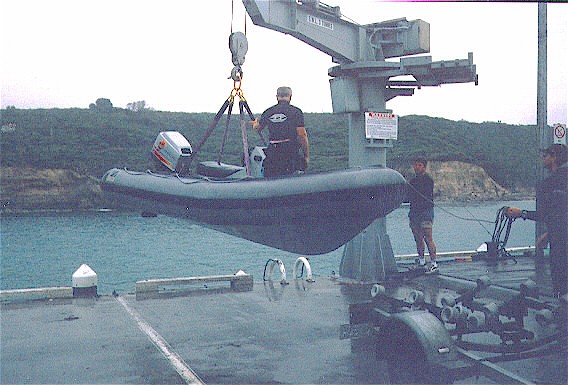
| Mutton Bird Island | Launching the RIB at Port Campbell | Zodiac at Port Campbell, early morning fog |
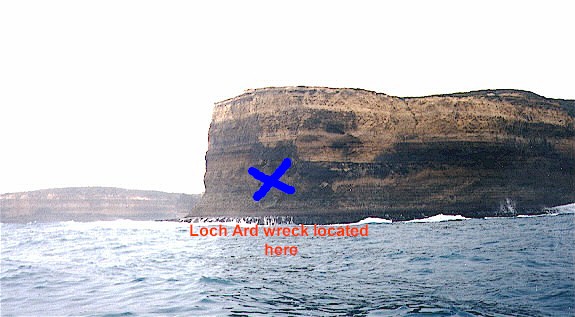
Loch Ard: The Loch Ard is a 80 metre sailing ship wrecked in 1878 at the Western tip of Mutton Bird Island near Loch Ard Gorge. The wreck was discovered by local divers in 1967 and blasted to recover some of the cargo and as a result the wreck is very broken up. Much of the original cargo of cement barrels, glass sheets, chandeliers, bottles and marble tiles lays amongst the wreckage in 23 metres of water. The wreck site is about 6 km east of port Campbell and can only be dived on a low swell.
Batman: The Batman was built in scotland in 1883 as an iron hulled steam hopper barge and she now lies in 46 metres of water in the Commonwealth ships grave yard off Barwon Heads. She was scuttled in 1935 and her mid sections have now started to collapse, but her bow is still quite intact. At the bow is her boiler which stands upright. She served with the Port of Melbourne for 50 years and was reported to have carried a gun for the Victorian Navy as an auxiliary gun boat at some stage in her life.
GPS S38º 21.380' E144º 24.591' Datum AUS66
Milora: The Milora was a steel screw steamship/collier built at Williamtown in 1921. She was owned by the Australian United Steam Navigation Company and ran aground on Lonsdale Reef in 1934. After being towed to Williamtown for repair she written of as to expensive to repair and towed the the Commonwealth Ships Grave yard in 1935 and scuttled. She now lies in 42 metres of water on a sandy bottom and is still complete but the wreck has started to collapse.
GPS S38º 21.164 E144º 23.317 Datum AUS66
Courier: The 726 ton Courier was built in 1887 and scuttled in the ships graveyard just outside Port Phillip Heads in1928. The wreck now lies in 42 metres with her mid sections collapsed. The bow and stern are intact and can be penetrated by the experienced diver. She has two large boilers sitting on the sand just forward of the mid section framework which protrudes from the sand.
GPS S38º 19.579 E144º 34.832 Datum AUS66
Coogee: The wreck of the Coogee lies in 34 metres of water just outside Port Phillip Heads near the Victorian Channels wave buoy. She was built in England in 1887 and scuttled in 1928. Her bow section stands upright and the rudder gear is covered in yellow zoanthids which makes this part of the wreck very colourful. Her midsections have collapsed and her large boilers are very prominent. The bow has fallen over but is still recognisable.
GPS S38º 18.519´ E144º 34.220´ Datum AUS 66
Rotomahana: The wreck of the Rotomahana lies in 40 metres of water off Barwon Heads. She was built in 1879 and scuttled in 1928. At 298.2 feet long she is a large wreck to cover in one no decompression dive. Her bow and stern are intact but the bow has fallen over. Her most prominent feature is her 4 large boilers which you can swim between.
GPS S38º 19.107´ E144º 32.225´ Datum AUS 66
Pioneer: The wreck of the Pioneer lies in 46 metres of water in the ships graveyard at Torquay. She is a good dive as the hull is intact and the wreck is more or less as the scuttled her in 1949. Prominant feature is her prop and rudder.
GPS S38º 20.366´ E144º 26.378´ Datum WGS 84
VBH 54 The wreck of VBH 54 lies in 42 metres of water in the ships graveyard at Torquay. She is a good dive as the hull is intact and the wreck is more or less as the scuttled her in 1970. Other than the hull there is not much to see but she is interesting to look at.
GPS S38º 20.587´ E144º 25.058´ Datum WGS 84